Proper Archery Stance and Form: A Step-by-Step Tutorial for Beginners
Why Stance and Form Matter Before You Ever Release an Arrow
Proper archery form is the single biggest factor separating consistent accuracy from frustrating inconsistency. Before you draw a recurve bow or compound bow for the first time, understanding why form matters will save you months of unlearning bad habits.
Think of your body as the machine that launches every arrow. If the machine operates differently on each shot, the arrow goes somewhere different each time. Consistent form creates a repeatable process, and repeatability is what accuracy actually is in archery.
There's also a safety dimension that beginners often overlook. Poor bow arm position leads to painful string slap on the forearm. Collapsing the draw arm under load strains the elbow and shoulder. These aren't minor annoyances — they're injuries that sideline new archers within the first few weeks. Getting the fundamentals right from day one protects your body while it builds the muscle memory you need.
Setting Your Feet: Choosing and Executing the Right Stance
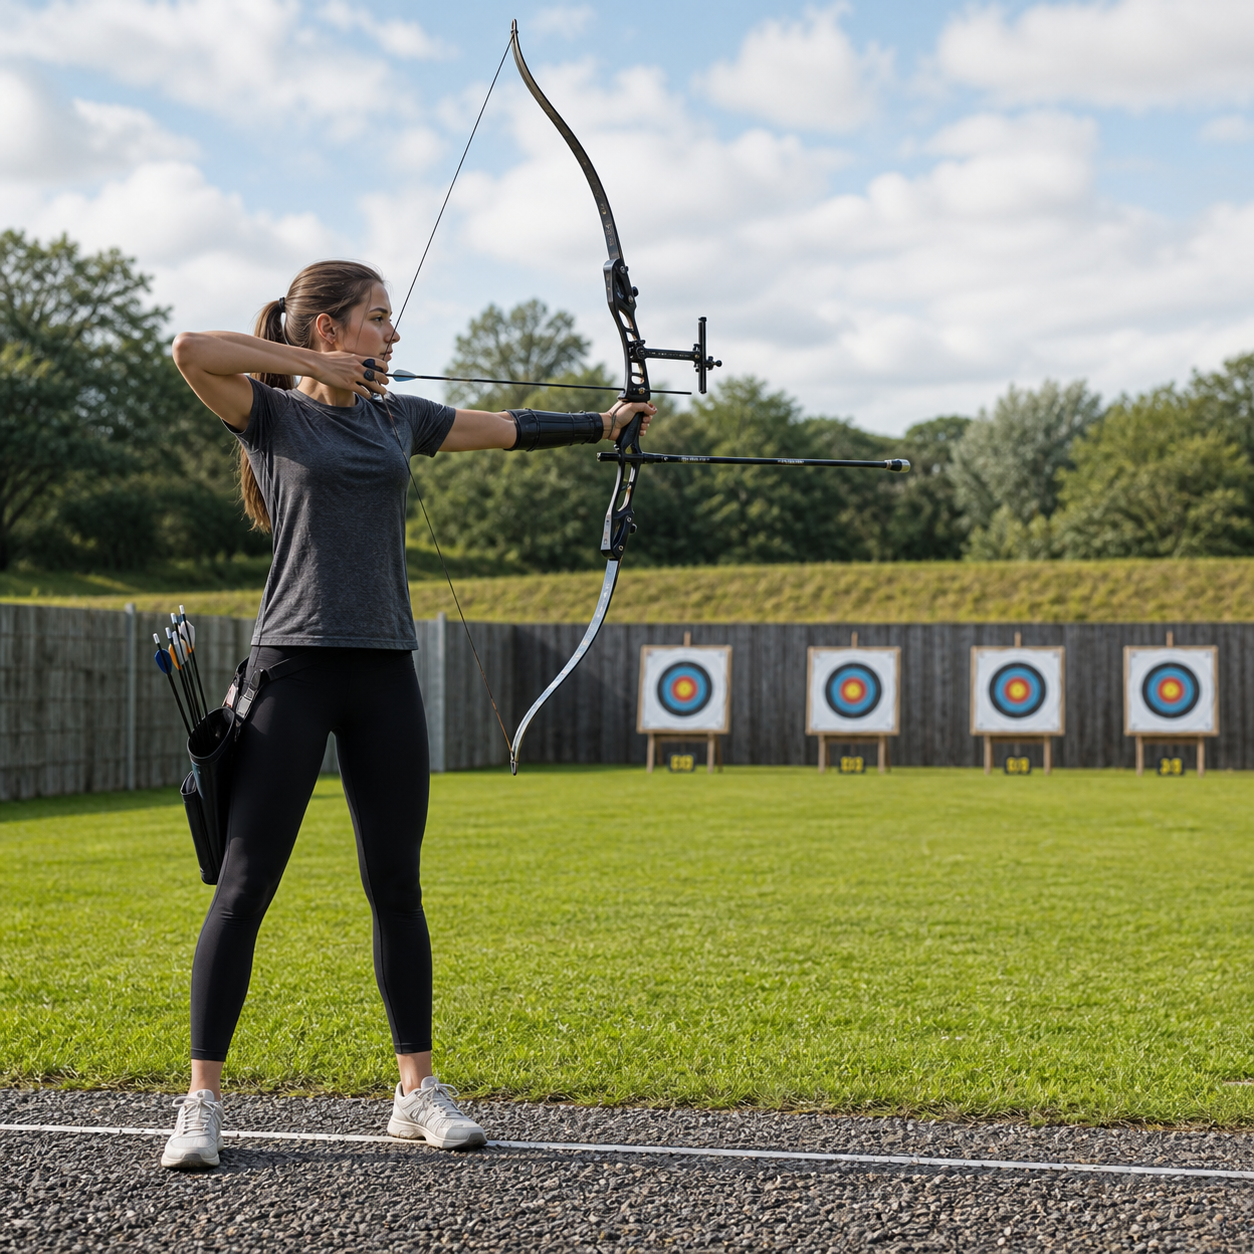
The correct beginner stance places your feet shoulder-width apart, perpendicular to the target, with your body side-on to the shooting line. This is called the square stance, and it's where virtually every beginner should start.
Here's how to set it up:
- Stand with your feet shoulder-width apart, weight evenly distributed on both feet.
- Position yourself so the shooting line runs between your feet — your toes should point at roughly 90 degrees to the target.
- Keep your knees soft, not locked. Locked knees cause fatigue and micro-sway that throws off your aim.
- Relax your hips and stand tall, as if a string is gently pulling the crown of your head upward.
You may eventually hear about the open stance, where the front foot rotates slightly toward the target. It reduces shoulder rotation issues for some archers and is worth experimenting with after a few months. For now, the square stance gives you a clean, neutral foundation that's easier to replicate shot after shot.
One practical check: once you're set up, close your eyes, draw your bow, and point it naturally. Open your eyes. If you're not pointing at the target, adjust your feet — not your aim. Your stance should naturally align you with the target.
Grip, Posture, and Bow Arm Alignment
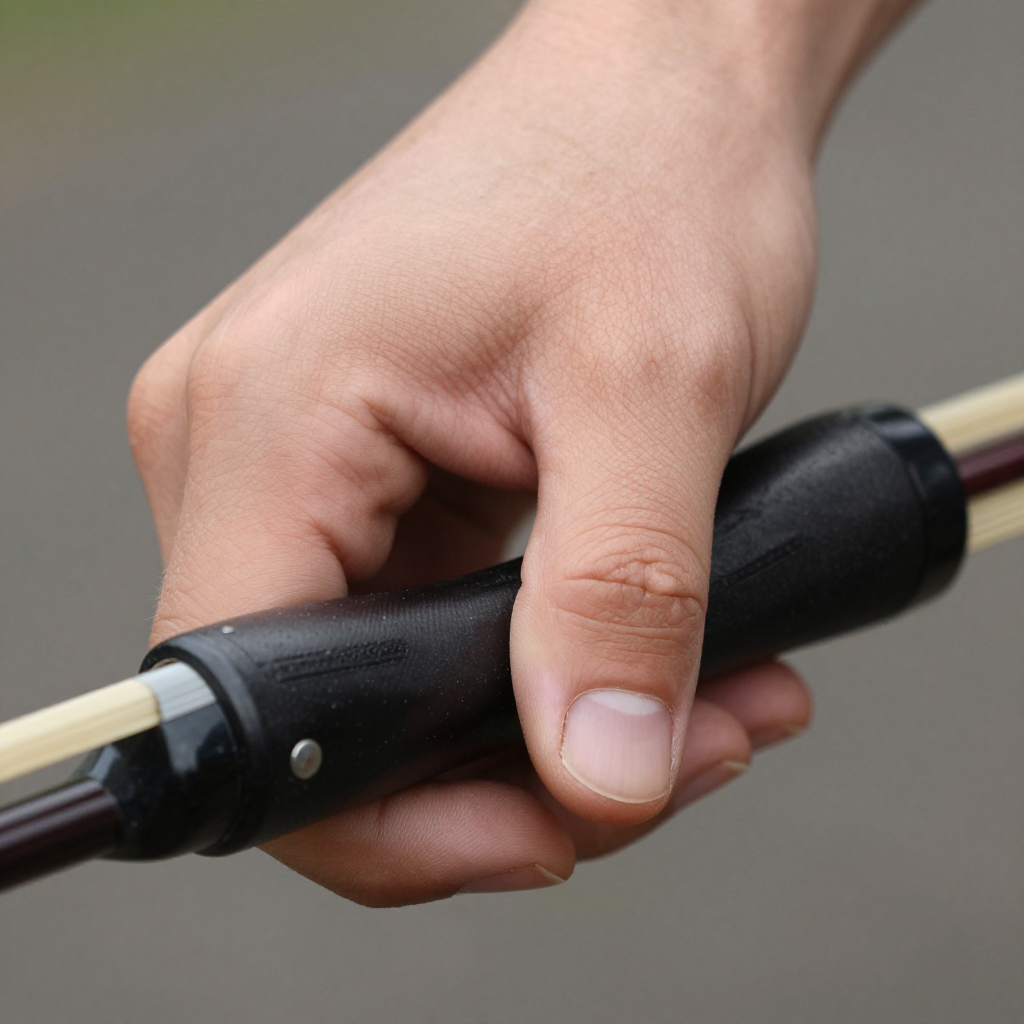
Hold the bow with a relaxed, open hand — the grip should rest against the meaty pad at the base of your thumb, not in your palm. This is one of the most important things to get right early.
A tense bow grip (often called a "death grip") torques the bow left or right at the moment of release, scattering arrows unpredictably. Instead, let your fingers hang loosely or use a wrist sling so the bow doesn't fall forward after the shot. The bow should feel like it's resting in your hand, not being strangled by it.
For bow arm alignment, extend your bow arm toward the target with a slight bend at the elbow — just enough to rotate the elbow crease outward, away from the string's path. This is what prevents string slap. If your forearm keeps getting hit, your elbow is rotating inward. Consciously rotate it outward until the string clears cleanly.
Your posture throughout should stay upright. Leaning back to compensate for draw weight, or hunching forward, both compromise your alignment and put unnecessary strain on your lower back. Stand straight, shoulders down and relaxed, chest open.
Drawing the Bow: Back Tension and the Shooting T
Draw the bow by pulling with your back muscles, not your arm. This is the concept of back tension, and it's what separates archers who plateau from those who keep improving.
Most beginners instinctively pull with their bicep and forearm. This works at low draw weights, but it's inconsistent and causes fatigue quickly. The correct movement feels like you're trying to squeeze a pencil between your shoulder blades — your draw-side shoulder blade slides toward your spine as you pull through the shot.
A useful mental image here is the T-form (sometimes called the shooting T). Picture a capital T: the horizontal bar represents your shoulders and draw arm extended, while the vertical bar represents your spine. When you're set up correctly at full draw, your body should form this T shape. Your bow arm and draw arm are in a straight line across your shoulders, and your spine is vertical beneath them.
To execute the draw:
- Hook the string with the first three fingers of your draw hand (index finger above the nocked arrow, middle and ring fingers below).
- Raise the bow and begin drawing simultaneously, keeping your bow shoulder down — don't let it creep up toward your ear.
- As you reach full draw, focus on continuing to engage your back rather than just stopping the arm movement.
Finding Your Anchor Point and Aiming
An anchor point is a specific, repeatable spot on your face where your draw hand comes to rest at full draw. Without a consistent anchor point, every shot starts from a slightly different position, making accuracy nearly impossible.
Common anchor points for beginners include the corner of the mouth, the cheekbone, or the chin — the right choice depends on your bow type and shooting style. For most recurve bow beginners, touching the index finger to the corner of the mouth while the string lightly touches the nose and chin works well. The key word is consistent: wherever you anchor, it must be the same tactile contact point every single time.
For aiming, beginners without a sight can use the tip of the arrow as a rough reference point and adjust through trial and error (this is called "instinctive aiming"). If your bow has a sight, align the sight pin with the target center at full draw while maintaining your anchor. Keep both eyes open if you can — it preserves depth perception and reduces eye strain over long practice sessions.
The Release and Follow-Through
A clean release happens naturally when back tension does its job — your fingers relax and the string slips away without any deliberate "letting go." This is called a surprise release, and it's the goal.
Trying to consciously release the string almost always introduces a flinch or grab that throws the arrow off course. Instead, keep increasing back tension at full draw until the fingers simply open on their own. It feels counterintuitive at first, but after a few practice sessions it starts to click.
After the release, hold your position. Your follow-through should look like this: bow arm stays up, draw hand drifts back naturally toward your neck or shoulder (pulled by the release of tension), and your eyes stay on the target. Don't drop the bow immediately to see where the arrow went — that peeking motion starts before the arrow has left the string and pulls your aim off.
A good follow-through isn't just aesthetic. It's evidence that you didn't introduce any last-second tension or movement. If your follow-through looks messy, something in the draw or release went wrong.
Common Beginner Form Mistakes and How to Fix Them
Most beginner errors fall into a handful of predictable patterns. Knowing them in advance means you can self-diagnose faster instead of ingraining bad habits over weeks of practice.
The Death Grip
What it is: Squeezing the bow handle tightly in the palm.
Why it happens: Holding something tightly feels secure and controlled.
Result: The bow torques at release, sending arrows left or right consistently.
Fix: Rest the grip on the thumb pad only, let the fingers hang loose, and use a wrist sling so you don't fear dropping the bow.
Collapsing the Draw Arm
What it is: The draw elbow drops or the draw arm moves forward before or during the release.
Why it happens: The archer runs out of back tension and compensates with arm movement.
Result: Arrows hit low and the draw weight feels heavier than it should.
Fix: Focus on the shoulder blade movement rather than the arm. If the problem persists, the draw weight may be too heavy for your current strength — drop down and build up.
Peeking at the Target
What it is: Dropping the bow arm or turning the head to watch the arrow before it's fully released.
Why it happens: Pure human instinct — curiosity and anticipation.
Result: Arrows hit low because the bow drops during the shot cycle.
Fix: Commit to keeping your bow arm up through the follow-through. Count to two after the release before moving.
Bow Shoulder Creeping Up
What it is: The bow-side shoulder rises toward the ear during the draw.
Why it happens: Tension and effort pull the shoulder upward naturally.
Result: Inconsistent arrow flight and neck/shoulder strain over time.
Fix: Before raising the bow, consciously push your bow shoulder down and back. Check this in a mirror during dry-fire practice.
Frequently Asked Questions
What is the correct archery stance for a beginner?
The square stance is best for beginners: feet shoulder-width apart, perpendicular to the target, with your side facing the shooting line and weight evenly distributed. It's the most neutral, repeatable starting position.
How do I find my anchor point in archery?
Choose a spot on your face where multiple contact points meet simultaneously — for example, index finger at the corner of your mouth, string touching your nose and chin. Practice drawing to that exact point every time until it becomes automatic.
Why does my bow arm keep getting hit by the string?
String slap almost always means your bow arm elbow is rotating inward. Rotate the elbow crease outward (away from the string path) and maintain a slight bend in the elbow. A proper relaxed bow grip also helps, since a tense arm tends to rotate incorrectly.
Should I use a square or open stance as a beginner?
Start with the square stance. It's easier to replicate consistently and teaches you correct shoulder alignment. Move to an open stance only after your square stance feels solid and you want to address specific shoulder or rotation issues.
How long does it take to develop consistent archery form?
Most beginners develop a recognizable, repeatable shot cycle within 4 to 8 weeks of regular practice (two to three sessions per week). True muscle memory — where the form feels automatic — typically takes 3 to 6 months. According to research on motor learning, consistent, deliberate repetition with feedback is the fastest path to reliable skill acquisition. The key is practicing correctly, not just frequently.